

Upcycled hipster bullshit pallet desk! Here’s how to make a thing.

I needed a nice big desk (I’m 6’4″) at the workshop so I could illustrate posters in peace, away from all the saws and dust. Buying a gigantic desk is expensive, and I happened to have tons of wooden pallets from all my Fringe Focus poster tube deliveries. Killed two birds with one stone, and chopped the pallets up into a mighty big desk. Plus I own a workshop, so DIY is the way to go.
How to make your pallet desk:

1. Get some pallets
Honestly, despite what the internet seems to indicate, pallets are not a magical resource ideal for furniture. They’re warped, chemically treated, full of staples, dirt, nails, and rust. They’re ugly, really. BUT if you’re looking to build a desk or table with a lot of character, something that can take a beating, then pallets are great! And it’s great to recycle! If you want a gorgeous flat piece of wood, look elsewhere. I had a ton of pallets in the basement because I receive all of poster tubes on pallets. You could find some at a grocery store if you don’t have any? Or Craigslist?

2. Rip apart the pallets
This isn’t the worst step of the process, but it’s up there. Use a claw hammer and wedge it beneath the board. Slowly rock the hammer to peel the board up, but be careful not to snap the board (pallets are brittle). I suggest moving across the entire board, slowly lifting it up by fractions of an inch at different locations. Many nails will be rusted or break, WEAR GLOVES. A crowbar helps for leverage, if you have one. If your pallet is particularly difficult, use a hack saw, jig saw, or whatever saw to detach the end points first! You lose about 1 inch on either end, but then you only have 3 nails to remove, instead of 9-10.

3. Choose your favorite pallet boards
You’ll want to chuck out severely damaged boards. I found that half of my boards were very dark, and the other half were light (two different pallets). So I chose to lay out the most interesting looking boards in this stripe pattern. Yours could be a lot cleaner, I was aiming for a dirty look.

4. Plan your desk size
I’m not gonna give exact dimensions here, because pallet furniture by nature is all going to vary a lot. But I wanted a very deep and wide desk. I have a large drawing tablet, two monitors, and usually lots of mess on my desk. I decided on an angled design, as that allows the edge facing me to be a tad longer. Even though the desk is 69″ wide, the edge facing me is around 76″ because it’s at an angle. The wide end was 3 feet deep, the shallow end about 2 feet deep. This also gives a wild forced perspective look, as I’m using progressively skinnier boards as they approach the shallow side. Plus I won’t have to struggle to reach a shelf on the wall on the 2 foot side (whereas a 3 foot deep desk requires you to stretch when reaching across).

5. Plane, joint, or rip your pallet boards
If you are lucky, your pallet boards will be exceptionally straight, blemish free, and without warps. I was not lucky. Many of the boards absolutely required jointing or planing so I could lay them flush with each other to form a table top. But I do not own a jointer or a planer. Solution? I ripped these mofos on the table saw. I did a few of them with a custom built table slaw sled. But many other boards I just ripped freehand or with the saw fence. This let an edge that bowed out half an inch or so become square. It was NOT perfect, but it was much better than attempting to build a desk surface with warped boards. You could also use hand planes on the surface, but the risk of damage is high with so many hidden nails / staples in pallet stock.

6. Stain your pallet boards
Because I had half dark boards and half light boards, I wanted to accentuate the contrast. I took all of my dark pallet wood, and applied a custom pickling stain to it. Basically it’s white vinegar with steel wool and tea bags in it! You let the steel wool begin to rust in the vinegar for a few days, then steep the tea bags. What you’re left with is a stain that rapidly ages your wood. It can make brand new wood look gray, and it made my dark boards even darker. You could also paint your boards, use traditional stain, or leave them untouched. I used my steel / vinegar mixture and it looked great.

7. Glue up your pallet boards
So it might be good to add joints & biscuits in your boards, but I just laid my pallet boards flush and glued them up. There’s a lot of surface area (and a lot of glue) so it worked. I clamped the wide boards in pairs, and I clamped the smaller boards in threes as seen above. IMPORTANT: My boards had wildly different thicknesses, so I am laying them upside-down to be flush with the work bench. The underside of the desk shows huge thickness differences, but the top is relatively even. You could avoid this by picking better stock, or planing the boards, but I figured I’m only using the top of the desk… so the bottom side can fuck off.
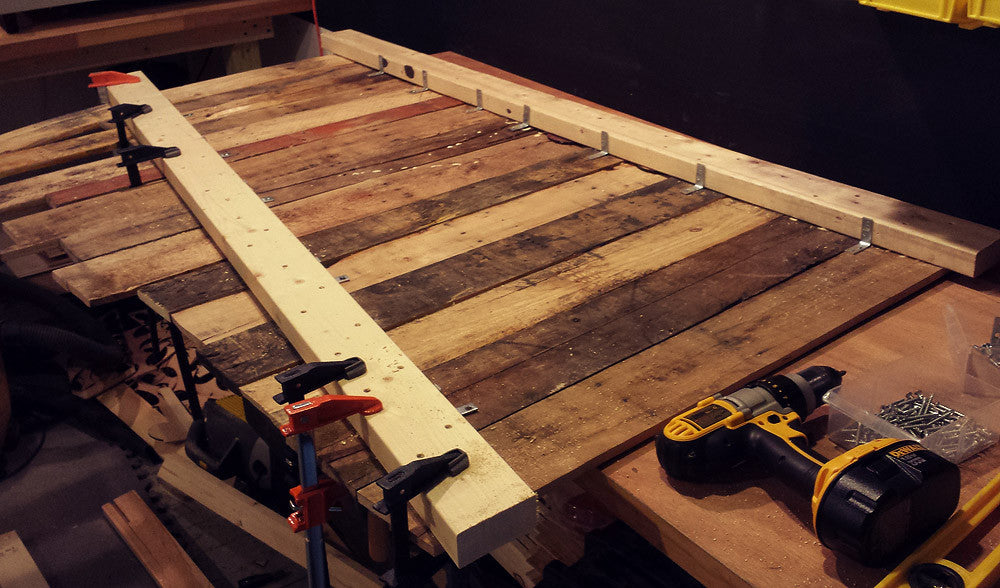
8. Bracket the hell out of your desk top
As I said, I chose very warped / destroyed / old pallet boards. So without a planer I had to rely on some trickery to ensure a level table top I can actually work on. This was done by clamping (and gluing) several 2x4s on the underside of the desktop. Again, the desk surface is flush with my workbench, but the underside has unevenness. I actually placed shims & wedges between the thin boards and the 2x4s to ensure an even fit. Each 2×4 is secured with steel brackets on ANY board that was too uneven / warping. Make sure you keep your clamps on until the glue is fully dry. Also, I put like 5 million screws through the 2x4s into the pallet boards for extra rigidity. Maybe overkill.

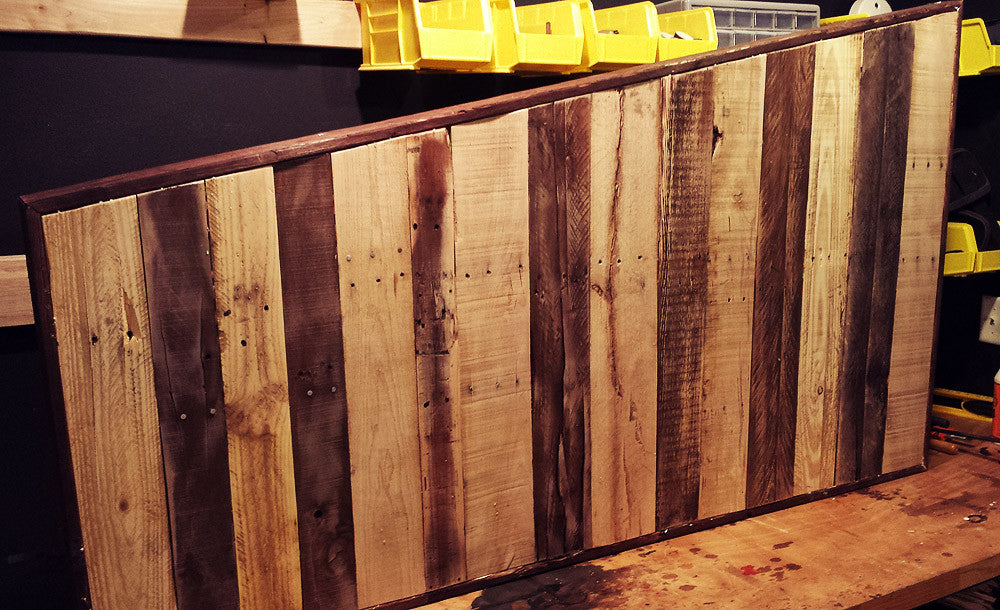
9. Cut the desk top down to size
Using the 2x4s as a guide, the desk top can be cut down to size. The ragged edges need to be cut flush. If you made a rectangular desk you could maybe skip this step, but since my desk has a 10 degree angle I had a lot to cut! If you have a large table saw, you could cut the entire desk top flush there. My saw and shop are simply too small, so using a handheld power saw (ideally circular saw) like a jig saw can work in a pinch. This desk is ‘rustic’ so cutting the edges even with a jig saw then sanding (with an orbital sander) worked fine! You can see my flush edge to the table top above (and some more dark stain). If you’re going for a clean look, you’ll absolutely need a table saw or jointer. I just said “whatever” and it was close enough.

10. Add an edge / border to the desk top
Since my pallet desk top was raggedly attached to some 2x4s, I had to hide the slop behind a nice edge. I had some 1x4s leftover from another project, and stained them dark brown for this desk. I used a miter saw to cut the 1x4s at the appropriate angles, and wrapped this 1×4 edge around the entire perimeter of the desk top. Basically 4 boards (each a different length). 45 degree miters on the back (straight) edge, with different angles for the front edge. Glue up the 1x4s (or whatever edge you like), and clamp like crazy. You could edge your desk with trim from Home Depot, paneling, or even tiles. But I went with stained 1x4s because that is what I had (I spent $0 on wood for this project).
11. Sand the pallet desk top
I used an orbital sander with roughly 200 grit sandpaper on the entire surface of the desk. In same cases I went so deep I took the stain right off (partially intentionally). There are a lot of divots, scratches, slivers, etc. in these boards. I wanted the surface rather smooth since I will be interacting with it daily. If your boards are relatively clean, this will be easy. If not, have patience, and wear a respirator! Pallet wood dust can be dangerous, so wear a mask and vacuum up all the dust.
12. Add legs to the desk!
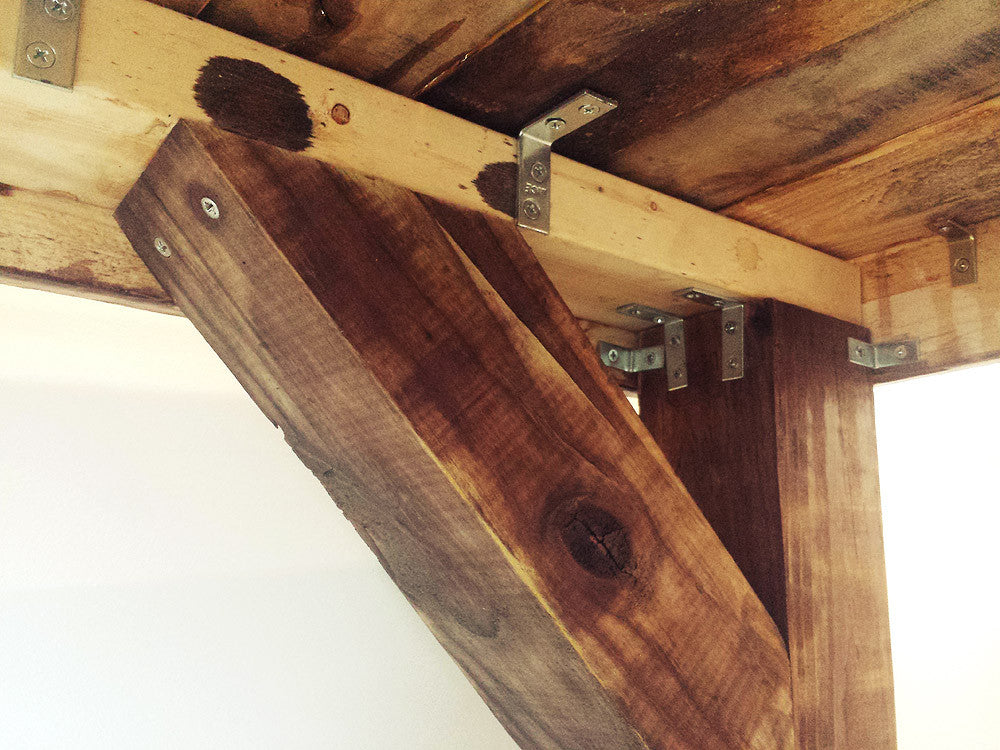
Unless you like working on the floor, you should add legs to your desk. I forgot my phone/camera the day I added the legs, but here is finished system for my leg brackets. I had some 4x4s laying around, so that informed my leg choices. You could easily use steel rods, or 2x4s, or even traditional lathed legs. But I used a 4×4 in each corner, with steel brackets securing it to both the 2×4 support beams AND the 1×4 edge beams. The 4x4s are placed directly under the 2×4 supports, to ensure the weight is distributed across the whole surface. Don’t just plop your legs under the thin pallet wood. For stability, I cut 45 degree angles with the miter saw on some 4×4 braces. These braces are secured with 2″ screws. You can make braces like this at any length you choose, it’s as much an aesthetic choice as it is a structural one. (The 4x4s were stained and sanded in the same fashion as the desk top)

13. Finish your pallet desk (literally)
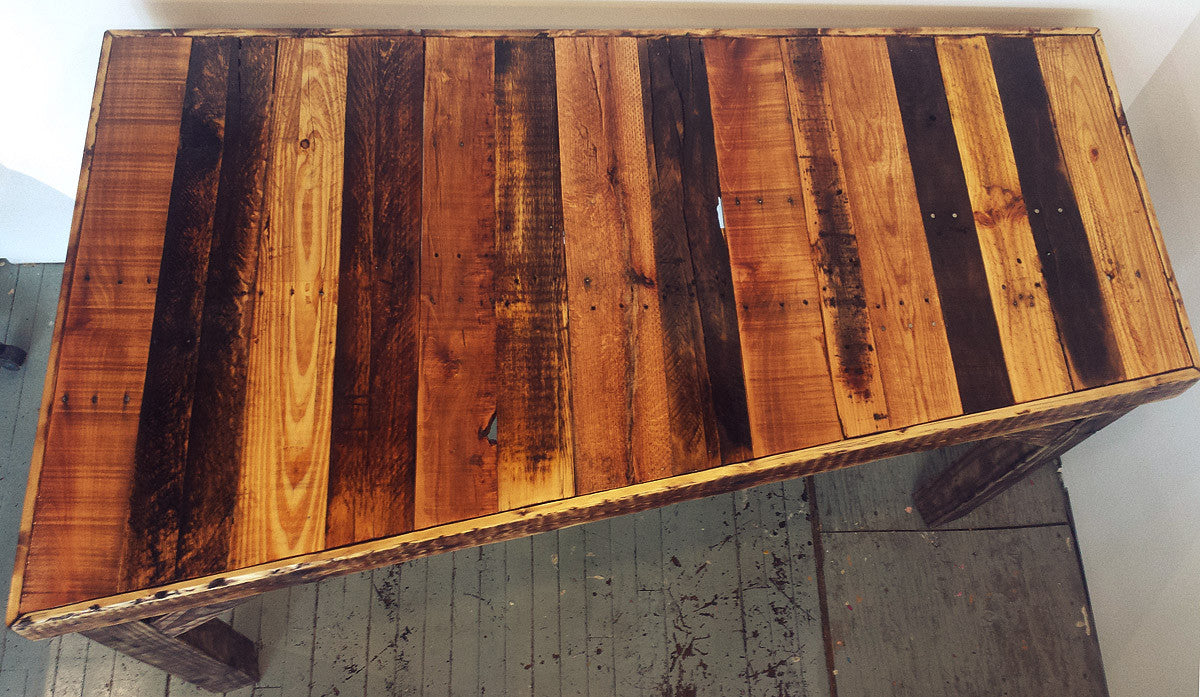
For finishing woodworking projects, I stick to a lot of the same procedures. I use my custom pickling stain (vinegar, steel wool, tea) for aging the wood when necessary, and I use Danish oil for most surfaces. I mix the Danish oil myself (in a jar). My Danish oil is 1/3 boiled linseed oil, 1/3 polyurethane, and 1/3 mineral spirits. This should be applied with a rag (or a brush) quickly across the entire surface, you want to ‘flood’ the wood so it absorbs the oil leaving no dry spots whatsoever. Let this soak in for 30 minutes, then remove the excess with a dry rag. Then re-apply in the same fashion and let this dry for 15 minutes or so. You can keep flooding with Danish oil on repeat for a while, but I find 2 or 3 coats to work. For coasters and small projects, I’d stop here.
For my desk, I added a final layer of brush-on (oil based) polyurethane a day after the Danish oil had dried. I applied a glossy polyurethane to the pallet desk top and edges, but NOT the legs, to give some contrast. This draws your eye to the glossy top, and makes it feel as if the bright desk surface is floating since you ignore the matte 4×4 legs. Depending on your desired finish (and quality of your wood) you can sand the desk with 0000 steel wool between coats, or 320 grit sandpaper for the polyurethane. Let the poly cure for at least a day before use. And you’ll want ventilation for these steps, as the fumes from the poly aren’t exactly good for you.

There, now go build a desk!
You can be first to know about new art prints & limited edition poster releases on the Fringe Focus Newsletter! New art each month. You are also entered to win a poster giveaway (at random) each month! Join thousands of Fringe Focus subscribers.